
TL;DR
A closet can become a surprisingly effective recording space when you focus on proper placement, strategic treatment, and ventilation. Acoustic foam alone won’t do the job; sealing gaps, decoupling vibrations, and thoughtful positioning make all the difference.
Ever wondered why your closet sounds better than your actual room for recording? It’s not just the foam. The secret lies in where you put your gear, how you treat the space, and how you control heat and vibrations. This isn’t about turning your closet into a professional studio overnight, but small tweaks can transform it into a quiet haven for vocals, voiceovers, or streaming. Understanding acoustic treatment can help optimize your space.
By understanding the difference between dampening and soundproofing—and applying some common-sense placement—you can shave off echo, reduce noise bleed, and keep your rig cool. No endless wall coverage or expensive gear required. Ready to make your closet a sound-smart space? Let’s get into it.
Acoustic dampening
& the rig in the closet.
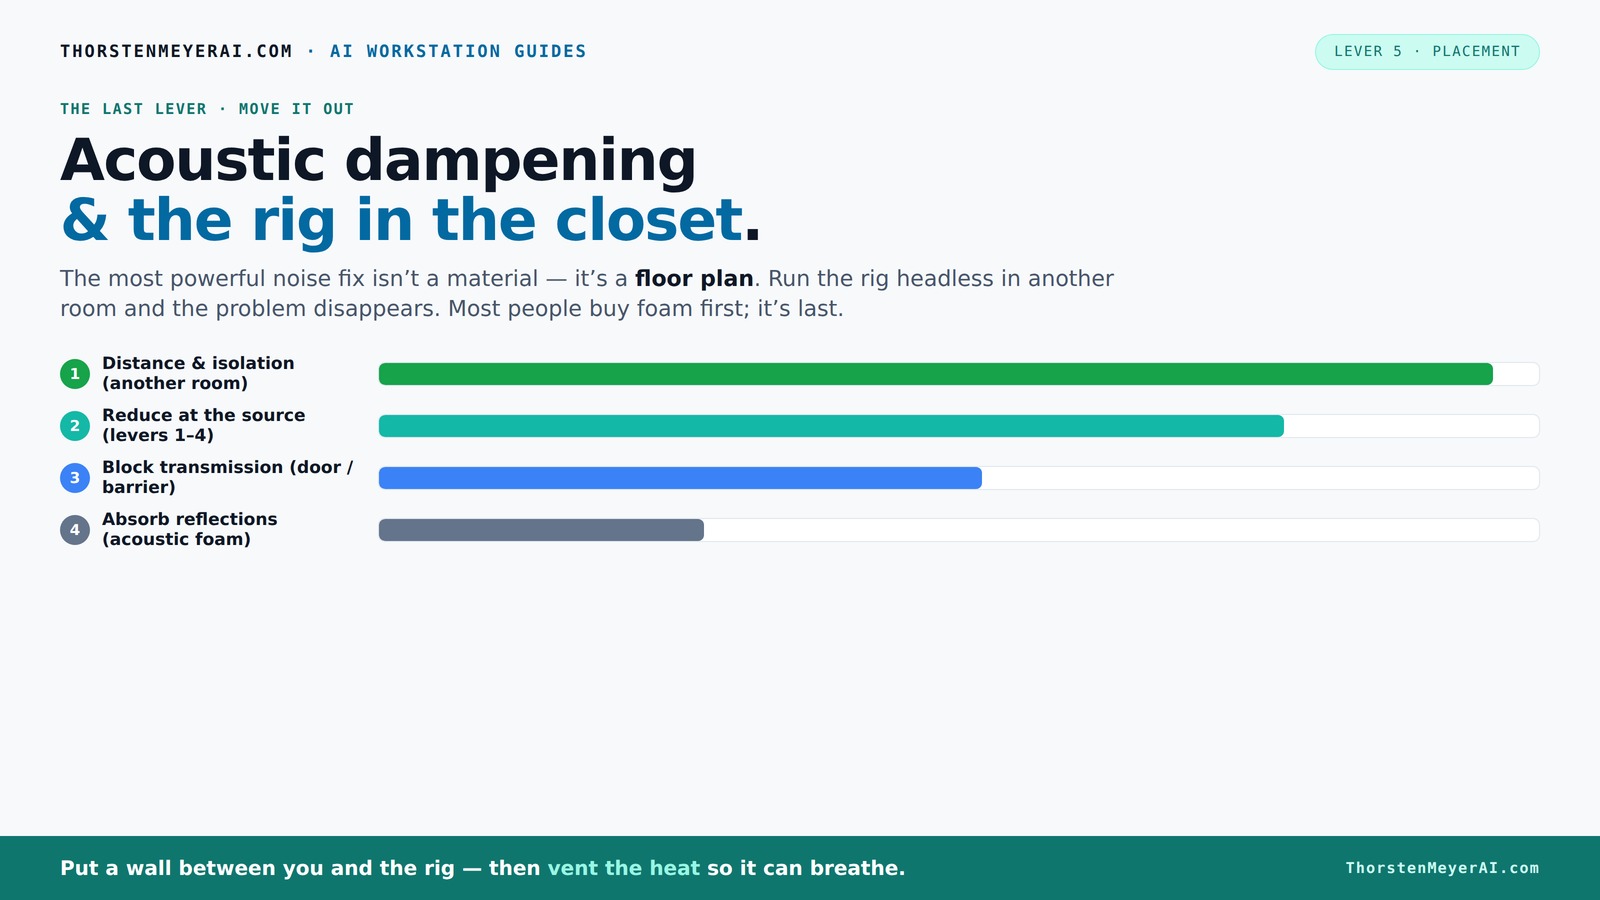
The most powerful noise fix isn’t a material — it’s a floor plan. A rig you can’t hear because it’s in another room beats any amount of foam. Tap the approaches in Part 1 to see what actually works.
(another room)
(levers 1–4)
(door / barrier)
(acoustic foam)
Contain the noise, not the heat
Key Takeaways
- Sealing gaps around doors, vents, and outlets dramatically improves sound isolation in a closet setup.
- Positioning your mic at the right reflection points and using bass traps reduces echo and low-frequency muddiness.
- Vibration decoupling pads and rubber feet cut down on mechanical noise transmission, improving recording clarity.
- Proper ventilation prevents overheating and maintains gear longevity in a sealed or enclosed closet.
- Foam panels help with reflections but won’t stop outside noise—combine with sealing and mass for real soundproofing.

Focusound 52 Pack Acoustic Foam Panels 1" x 12" x 12" Sound Proof Foam Panles Soundproofing Noise Cancelling Wedge Panels for Home Office Recoding Studio with 300PCS Double-Side Adhesive
Soundproofing - Acoustic foam panels triangular grooves structure for better noise absorption, helps to reduce and absorb unwanted...
As an affiliate, we earn on qualifying purchases.
As an affiliate, we earn on qualifying purchases.
Why Your Closet Can Be a Game-Changer for Sound (And What It Isn’t)
Closets are natural mini studios in disguise. They block room reflections, deaden echo, and provide a cozy, contained environment. But they’re not soundproof prisons. External noise like street sounds and HVAC vents still leak in unless you seal gaps and block entry points.
Think of your closet as a reflection filter on steroids—perfect for controlling how sound bounces back from walls but not a fortress against outside noise. If you want a space that’s both quiet and cool, understanding this distinction saves you a lot of frustration and money. For more tips on soundproofing, check out personal finance advice.
Real-world example: A YouTuber used a closet with foam panels and a door seal, and her voice sounded clear and warm. But during a windy day, you could still hear cars outside. That’s because foam only soaks up reflections, not external noise.
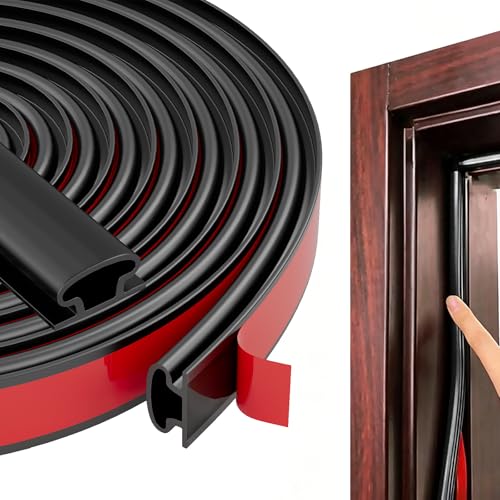
Black Rubber Weather Stripping Door Seal Strip, D Shape Door Weather Seal Strip, Self-Adhesive Soundproofing Frame Insulation Tape for Doors Frame/Window Seal,Blocks Cold Drafts Noise
【THICKENED SILICONE MATERIAL - COMPLETELY BARRIERING AIR AND NOISE】:The weather stripping is made of thickened TPE material with...
As an affiliate, we earn on qualifying purchases.
As an affiliate, we earn on qualifying purchases.
The Essential First Step: Seal Gaps and Block Leaks
The biggest sound leaks aren’t the wall panels—they’re gaps around the door, vents, and electrical outlets. Sealing these cracks is like closing the biggest holes in a sieve. Use weatherstripping, draft stoppers, or even a heavy blanket over the door for a quick fix. For more on sealing and soundproofing, visit acoustic sealing techniques.
Imagine sealing a closet door with weatherstripping—suddenly, outside noise drops sharply. It’s an inexpensive, effective move that’s often overlooked. For a more thorough job, add acoustic sealant around vents and outlets to cut down on noise sneaking in.
Pro tip: When sealing, aim for the tightest fit possible. Gaps as small as 1/8 inch can let in significant sound—so don’t skimp on sealing every crack.

Ekkogo Studio Monitor Isolation Pads Premium Acoustic Foam Elevates Audio Ideal for 5 Inch Speakers Enhanced with Vibredux HD Foam for Superior Isolation
【ADVANCED VIBREDUX HD FOAM】: Experience the acoustic excellence of Vibredux HD foam with Ekkogo's Studio Monitor Isolation Pads....
As an affiliate, we earn on qualifying purchases.
As an affiliate, we earn on qualifying purchases.
Placement Matters: Positioning Your Mic and Gear for Best Sound
Where you place your microphone and gear in the closet makes a huge difference. The goal is to minimize reflections and echo while capturing a clean, warm sound. Learn more about microphone placement for home recordings.
Start by facing the mic away from reflective surfaces like clothes or hard walls. Use the closet’s corner for bass trapping—low frequencies tend to build up there, creating a boomy sound. Place your mic about 6-12 inches from the wall behind it, and angle it toward your mouth.
For recording vocals, position yourself so your mouth is about 3-6 inches from the mic, and keep a buffer of a blanket or foam behind you to absorb echoes. This setup reduces the 'roominess' and echo that tiny spaces tend to produce.
**Deeper insight:** Proper placement minimizes the room’s influence on your sound, but it’s a balancing act. Too close, and you risk proximity effect; too far, and reflections creep in. The key is to find a sweet spot where your voice sounds natural yet controlled, which often requires some experimentation. Also, angling the mic slightly away from reflective surfaces can help reduce unwanted echoes, while positioning your head to avoid direct contact with clothing or hard surfaces prevents sound coloration. Achieving this balance ensures your recordings are both warm and clear, rather than muffled or echoey.

Audimute Soundproofing Acoustic Door Seal Kit - Door Sweep and Seal - (Large Size)
Includes (2) Door Seals (3/16" x 1/2" x 50') and (1) Door Sweep (1/2" x 1.5" x 25').
As an affiliate, we earn on qualifying purchases.
As an affiliate, we earn on qualifying purchases.
Acoustic Treatment in a Tiny Space: What Works and What Doesn’t
In a closet, simple absorption tricks go a long way. Place foam panels at first reflection points—these are spots where sound bounces directly from the source to your ears or mic. Use a mirror to find these points: sit or stand in your usual recording position, then look for the wall behind the mic. The spot you see in the mirror is where you want your panels. For more on acoustic treatment, visit acoustic treatment tips.
For low-end control, bass traps in corners reduce boomy frequencies. In small closets, thick panels (2-4 inches) absorb more low frequencies, but even thinner foam helps tame high-end flutter echoes.
Deeper insight: The placement of absorption materials isn't just about sticking panels randomly. It’s about targeting the most problematic reflections—those that directly reach your microphone or ears. First reflection points are critical because they cause the most audible comb filtering and echo. By installing panels at these points, you effectively break the cycle of reflections that color your sound. Bass traps in corners are equally important—they prevent low-frequency buildup that can make vocals sound muddy or boomy. In tight spaces, this low-end control is vital because small rooms tend to amplify bass waves, leading to a less clear sound. Using thicker panels for bass traps offers more effective low-frequency absorption, but even simple foam can make a noticeable difference when placed correctly.
Real-world tip: Using a thick blanket or duvet not only softens reflections but also adds a layer of absorption that can be moved or adjusted. This flexibility is especially useful if you’re experimenting with different mic positions or recording setups.
Bass Traps and Low-Frequency Control: Do You Need Them?
Bass traps are crucial if your closet sounds boomy or has low-frequency buildup. These are thick panels placed in corners, where standing waves tend to form. In a small space, low frequencies bounce around and cause muddiness.
Adding bass traps can improve clarity, especially for vocals and voiceover. In a tiny closet, a couple of 4-inch thick panels tucked into the corners can make a noticeable difference.
**Deeper insight:** Bass traps are often misunderstood as optional, but in small, enclosed spaces, they are essential for achieving a balanced sound. Low-frequency waves tend to reflect and resonate, creating peaks and dips in your audio spectrum. Without proper trapping, these low-end issues can cause your voice to sound muffled or boomy, making it harder to achieve professional-quality recordings. Installing bass traps in the corners—where these waves naturally gather—acts like a sponge, absorbing these problematic frequencies before they bounce around and muddy your sound. The thicker the panel, the more effective it is at low-frequency absorption. For most closet-sized setups, 4-inch panels are a good starting point; for more precise control, thicker or multiple layers can be added. Recognizing when and where to place bass traps is key to balancing your sound and ensuring your voice or instrument remains clear and natural.
Vibration Control: Keep Your Closet Rig Quiet Without Adding Noise
Mechanical vibrations often sneak in through contact points—floor, desk, or walls. These vibrations can cause your gear to rattle or transmit hum into your microphone. Anti-vibration pads, rubber feet, or decoupling mounts are simple ways to cut down on this.
Imagine placing your PC on a thick rubber mat—suddenly, the low-frequency hum diminishes. These tricks are especially useful if you record near noisy appliances or in a space with foot traffic.
**Deeper insight:** Vibrations are often overlooked, but they can be a significant source of noise and unwanted sound coloration. When your gear is directly coupled to a vibrating surface, even tiny tremors can be transmitted as low-frequency hums or rattles. This is especially problematic in small spaces where the sound of footsteps, HVAC vibrations, or even the building’s structural resonance can seep into your recordings. Using anti-vibration pads or decoupling mounts creates a physical barrier, preventing these vibrations from traveling into your sensitive equipment. While simple in concept, the tradeoff is that improper placement or low-quality pads might not fully isolate vibrations, so choosing the right materials and positioning is crucial. Proper vibration control ensures your recordings are free from mechanical noise, maintaining clarity and professionalism.
Ventilation and Heat: Keeping Your Closet Rig Cool and Safe
A sealed closet traps heat, cooking your gear and risking overheating. The fix? Proper ventilation. At minimum, install a passive vent or a quiet exhaust fan in the door or wall to let hot air escape.
Some people build custom soundproof cabinets with ducted airflow—these combine sound dampening with cooling. For DIY, a small, quiet PC exhaust fan can keep temperatures in check, especially during long sessions.
**Deeper insight:** Effective ventilation isn’t just about comfort; it’s a critical component of maintaining your equipment’s longevity. Overheating can cause hardware to throttle performance or even fail prematurely. Small, enclosed spaces like closets tend to trap heat because of limited airflow, especially when using high-power gear or recording for extended periods. Installing a passive vent allows hot air to escape naturally, but it may not be sufficient if your space is very sealed. In such cases, a quiet exhaust fan—designed specifically for minimal noise—can actively draw out warm air without introducing additional sound into your recordings. When choosing ventilation solutions, consider the balance between noise levels and airflow capacity. Proper airflow prevents heat buildup, reduces thermal stress on your equipment, and ensures consistent performance during long sessions. Remember, a well-ventilated closet is a safer, more reliable workspace that preserves your gear’s lifespan and maintains optimal recording conditions.
DIY Solutions and Budget Hacks for Small Space Soundproofing
If you’re on a budget, don’t worry. Thick blankets, moving pads, and rugs help absorb reflections and reduce noise transmission. Use furniture or stacked books to decouple your gear from the wall—this minimizes vibrations and structure-borne sounds.
For a quick boost, drape a thick blanket over your gear, or hang a quilt behind your mic. These simple fixes can significantly improve sound quality without breaking the bank.
**Deeper insight:** When working with limited funds, understanding the physics of sound and vibration helps you get the most bang for your buck. Thick blankets and rugs serve as effective broadband absorbers, softening high-frequency reflections and reducing the amount of sound that escapes or enters. Decoupling your gear from contact surfaces—like placing your microphone stand on a foam pad or stacking books under your equipment—minimizes the transfer of vibrations that can cause rattle or low-frequency hums. These methods don’t just save money; they also promote a more controlled sound environment. The key is to identify the most problematic reflections and vibrations in your space and target those with simple, inexpensive materials. This hybrid approach—combining DIY absorption with vibration decoupling—can elevate your audio quality significantly without requiring professional-grade treatment.
What Not to Expect from Foam and Cheap Treatments
Foam panels are great for reducing reflections, but they won’t block out street noise, HVAC, or footfalls. If you hear outside sounds, sealing gaps and adding mass are your best bets. Foam is a reflection filter—not a soundproofing wall.
Don’t fall for marketing claims that foam alone will turn a closet into a soundproof booth. It’s a good start, but real soundproofing requires sealing, decoupling, and often, structural modifications.
**Deeper insight:** Many newcomers assume that foam panels are a magic bullet for soundproofing, but this misconception can lead to disappointment. Foam’s primary function is to absorb mid and high frequencies, which helps reduce echo and flutter. However, it does little to prevent external noise from entering or leaving the space—especially low-frequency sounds like traffic or HVAC rumble. Achieving true soundproofing involves a combination of sealing all gaps, adding mass (like drywall or mass-loaded vinyl), and decoupling structures to prevent vibrations from transmitting through walls. Recognizing these limitations helps set realistic expectations and guides you toward more effective solutions. For instance, sealing gaps around doors and windows, and adding dense materials, are more effective at blocking external noise than foam alone. This understanding prevents wasted effort on ineffective treatments and helps you prioritize strategies that deliver real results.
Final Tips: Making Your Closet a Practical, Quiet Space
Start with sealing gaps and blocking leaks. Then, position your mic carefully, using reflection points, bass traps, and blankets. Don’t forget ventilation—your gear needs to stay cool and safe.
Combine DIY fixes with a few good panels at critical reflection points. Remember, a well-placed blanket or rug can be just as effective as expensive foam in a tiny space.
Most importantly, treat your space as a system—airflow, vibration, reflections—and you’ll get much better results than relying solely on foam.
Deeper insight: Approaching your closet as an integrated acoustic system means understanding how each element interacts. Sealing gaps prevents external noise intrusion, but it also alters the internal acoustics—potentially making the space sound dead or unnatural if overdone. Proper mic placement and reflection management ensure your recordings remain natural and lively. Ventilation isn’t just about comfort; it’s about maintaining a stable environment for your gear’s health and performance. Combining these strategies thoughtfully allows you to optimize your small space without sacrificing usability or sound quality. Remember, the goal isn’t perfection but achieving a balanced, controlled environment that supports your creative work effectively and affordably.
Frequently Asked Questions
Is acoustic dampening the same as soundproofing?
Not quite. Acoustic dampening reduces reflections and echo within a space, making it sound better. Soundproofing blocks outside noise from entering or leaving, which requires sealing gaps, adding mass, and sometimes structural modifications.How much treatment do I need in a closet studio?
Start with sealing gaps, then add foam panels at reflection points, and bass traps in corners if needed. For small spaces, a few strategically placed panels can make a big difference without overwhelming the space.Where should I place acoustic panels in a closet?
Place panels at first reflection points—use a mirror to find these spots behind your mic. Also, add bass traps in the corners to control low frequencies and reduce muddiness.Do I need bass traps in a closet-sized booth?
Yes, especially if you notice low-frequency boominess or muddiness. A couple of thick panels in the corners can dramatically improve clarity for vocals and voiceovers.Should I face the mic toward the clothes or the open space?
Position your mic facing the open space and away from reflective surfaces like clothes or hard walls. Use blankets or foam behind you to absorb reflections and keep your voice crisp.Conclusion
Your closet can be a surprisingly effective mini studio—if you treat it like a system. Seal gaps, position your gear wisely, and add ventilation. The result? Clearer recordings, less noise, and a space that works for voice, streaming, or music, without breaking the bank.
Think of your closet as a tiny, controlled environment—like a musical instrument. Fine-tune it with simple fixes, and it’ll reward you with professional sound quality every time.